
Profile Options
In simple terms you can say that profile options are used to
determine how the application should work. In other terms Profile Options in
oracle apps are used to control the behavior of application.
Types of Profile
Options:

System: System
profile options are visible to System Administrator responsibility only and it
can be updated by System Admin responsibility only.
User: User
profile options are visible to the end-user and can be updated by the end-user.
I will show you how to create a profile option and a simple
example of a profile option so that you can understand it easily.
Levels of Profile
option:
We can set the profile options at different levels, below
are the five levels of profile options.
- Site: Applicable to the whole system.
- Application: Applicable to particular applications such as AP, PO etc.
- Responsibility: Applicable only to particular responsibility.
- Organization: Applicable to the particular organization.
- User: Applicable to the particular user only.
The highest profile option can be set at the Site level and the
lowest is the User level.
Creating Profile
Options:
è Login to Oracle application and switch to
“Application Developer” Responsibility and follow the navigation.
Application Developer > Profile.

Now
it will open the below form, fill all the mandatory fields and save the record.
Name: Give an appropriate name for
your profile option.
Application: Your custom
application name.
User Profile Name: This name is
visible to the user so give the same name as given above for the NAME field.
Hierarchy Type and Access
Level: What level these profile options
should be visible to users.
SQL Validation: This is can be
used to give the LOV to your profile option values. If this is blank then there
will be no LOV for your profile option then you can enter a free text
.


è Next step is to assign a value to your profile
option, follow the below navigation
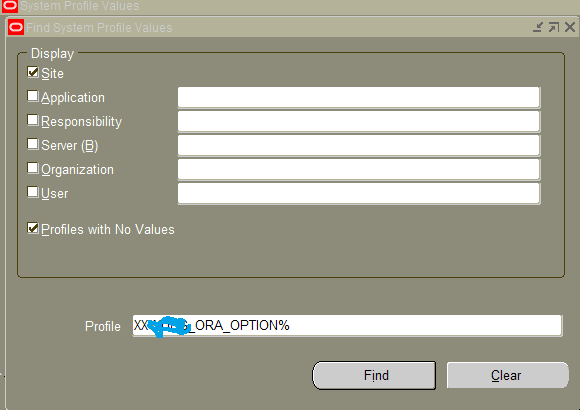
System Administrator > Profile > System.

It will open the below form, Now give your profile
name and click on the FIND button.
Now enter your profile option value as shown below.

That’s
it, guys.
Now
let us see how to use this profile option in our custom program.
How to get profile option value from the backend?
We can get the profile option value by calling the below procedure.
We
can assign a value to the profile option by calling the below procedure.

Let
us see a real-time scenario and usage of the Profile option.
In the above example, I have set the ‘XX_ORA_OPTION’ value to “Yes”, now I will use
this profile option to restrict a program.
I
have added the below-highlighted code in my program.
It
will check the profile option value first, if it is set to “NO” then my program
will complete normal else it will go to error.

Our
profile option value is to set “Yes”, now let us submit our program and check
the results.

So the
program completes in error and below is the output.

No comments:
Post a Comment